

Tuesday, March 29, 2011
Saturday, March 26, 2011
Savvy Cat Sign and Sunflower Saturday
I am loving my new Cricut Expressions. This past week I purchased a software called Sure Cuts A Lot, which allows me to cut out images that I create on my own. I have been playing with Adobe Illustrator, coming up with all kinds of ideas. Here is a sunflower I made today. I designed it in Illustrator and then used my new SCAL software to cut it out on the Cricut. Then inked and curled the edges and glued all the pieces together. This one measures about 3 inches around.

I am also in the process of making a wooden sign that says Savvy Cat. Cricut has been a big part of this project as well. I got some wooden flower shapes at the dollar store the other day... a whole package of 10 was $1!!! And for some reason I had 11 in mine, but I won't complain. Painted them green (of course). This paint is really cool. It's metalic. I also painted the edges with another green paint that's super glittery. Then I added letters, which I cut out using my Cricut (love this machine!) in the middle and Mod Podged over the whole thing several times. I am so happy with the way this project is turning out so far. Hopefully I will have more time to play with it tomorrow... teal and brown are the plan for the background.


I am also in the process of making a wooden sign that says Savvy Cat. Cricut has been a big part of this project as well. I got some wooden flower shapes at the dollar store the other day... a whole package of 10 was $1!!! And for some reason I had 11 in mine, but I won't complain. Painted them green (of course). This paint is really cool. It's metalic. I also painted the edges with another green paint that's super glittery. Then I added letters, which I cut out using my Cricut (love this machine!) in the middle and Mod Podged over the whole thing several times. I am so happy with the way this project is turning out so far. Hopefully I will have more time to play with it tomorrow... teal and brown are the plan for the background.


Friday, March 25, 2011
The Walrus aka Chloe's new toy

I have made these toys for Chloe several times, and she absolutely loves them. They are quick and easy to make and are pretty much free. First, let me explain why we call it "the walrus". Well, I will let the pictures speak for themselves:


And as I was looking for a picture of a walrus on the Internet, I also came across this one:

I got this really cool stash of shirts from my niece today. I have been looking for some pink, since it's Chloe's favorite color (at least I think so)... so thank you Grace for your donation.

Supplies you will need - t-shirt and scissors. Yup, simple as that.
First disassemble your shirt. Because mine was a smaller size I needed to find the biggest piece I could work with. You want a nice solid piece with no seams.

Lay your fabric piece flat and cut it into as many wide strips as you can. I made mine about 2.5" - 3" wide and ended up with 8 strips that were about 15" long. You can use more strips, it will make your toy fuller. Less strips will make it kind of flimsy.

Then stack your strips and tie a knot in the middle.


Now take each strip and cut it into thinner stips toward the knot. I made mine about 1" wide.

Once all your strips are cut, take each one and stretch it out. They will form these cool tubes.

And once that's done... you have yourself your very own Walrus Toy.
Tah - Dah!!!
Tah - Dah!!!

I also used some of the same fabric to make this really cute headband for my niece as a Thank You for parting with her old clothing items... and allowing me to cut them up.

Saturday, March 19, 2011
New Toy - Cricut - In GREEN
I have been thinking about getting one of these for a while now... and today was the day. I saw them at Walmart in a few cool colors... and they only had one green... and it was on sale. Well, I think it had my name written on it. So, I just had to splurdge and get it. You might not see me for a while, I will be playing with my new toy! Can't wait to plug it in...


Friday, March 18, 2011
Sunny Preview
The reason I've been so quiet for the past week is because I have been working on projects for the next class. Here is a little preview of some of the things I've come up with... It is just a preview... a little peek... You will have to come to the class to see more. Oh, and one more thing. There will be cholocate and glitter involved!!!


Thursday, March 17, 2011
Etched Glass - can I really do this?
 |
| This is the end result of my first attemtp at glass etching. It was a super easy, fast.. and very satisfying project. |
 |
| Supplies you will need: something glass (obviously). I purchased these two candle holders a the Dollar Tree. They are probably about 4" tall. The reason I have two is because my sweet husband, who was home not feeling too well today, said he would like to do a project with me. What a good sport he is! OK, now back to the supplies. You will aslo need Glass Etching Cream. I purchased mine at Michaels. Not cheap but goes a long way. I think my 3 oz. bottle was $12.99 but I used a 40% off coupon, so it was quite a bit less. We used foam brushes to apply the cream. Another thing you will need is some sort of a stencil. I bought some at Michaels but decided not to use them because I didn't have repositinobale adhesive... blah blah blah. So, we improvised... next step. |
 |
| I used my Big Kick and cut out a flourish (Tim Holtz's die) on some contact paper. You obviously don't need printed contact paper but that's what I had on hand, leftover from when we lined our bathroom drawers. |
 |
| Then I removed the flourishes and saved them for another use... don't know what that use might be quite yet. You need the negative space in order to create the stencil. |
 |
| We then attached it to the glass... and used some more contact paper around the edges, so the cream wouldn't get on the parts where we didn't want it. You also want to make sure to remove any air bubbles, so the cream won't get under your stencil. |
 |
| Here is my Honey applying the etching cream to the glass. |
 |
| We applied it very liberally, tapping it on, not brushing. I think it works better that way. But since it was our fist time, we don't really know. The directions say to let it sit for about 5 minutes. I followed the directions, and Greg left his for about 15 minutes, to experiment... we didn't see much of a difference between the two. |
 |
| Then you rinse the whole thing, washing away all of the etching cream. |
 |
| Then peel away your stencil... and marvel at the beauty of your newely etched glass. It's SO cool! |
 |
| Here are our two candle holders side by side. I still need to remove the labels from the bottom... and get some candles to go in them. |
Monday, March 14, 2011

Wednesday, March 9, 2011
Cattitude Stamps
Oh my goodness... whenever I saw these stamps I just flipped. I LOVE these cats... Then I realiszed that they were on clearence ($3.99). This bargain lover thought she was going to have a heart attack! Purrrrfect...


 |
| This one is my favorite... So Sassy! |
Tuesday, March 8, 2011
One of my headbands... on a beautiful baby girl. Makes me smile!

Once again, I have to give credit for a beautiful photo to my friend Sharon Korsu for capturing such a precious moment.
Monday, March 7, 2011
Bird Cage Tutorial
 |
| I saw a simiar project online and just had to recreate it. I really like birdies this time of year. |
 |
| First I cut 6 strips of printed paper measuring .5"x12" |
 |
| Then I stacked all 6 strips on top on one another. Using a ruler I found the center and punched a hole. Then I used a brad to attach the strips together. |
 |
| For the base I used the lid from a Nutella jar. Althought I don't have any idea why, but I have had it saved for a while now and was so happy to finally utilize it. Then I measured the rim of the lid so I could cut an additional strip to cover it. Mine measured .75" x 12" (I didn't quite need 12" but it's always better to have more than not enough) |
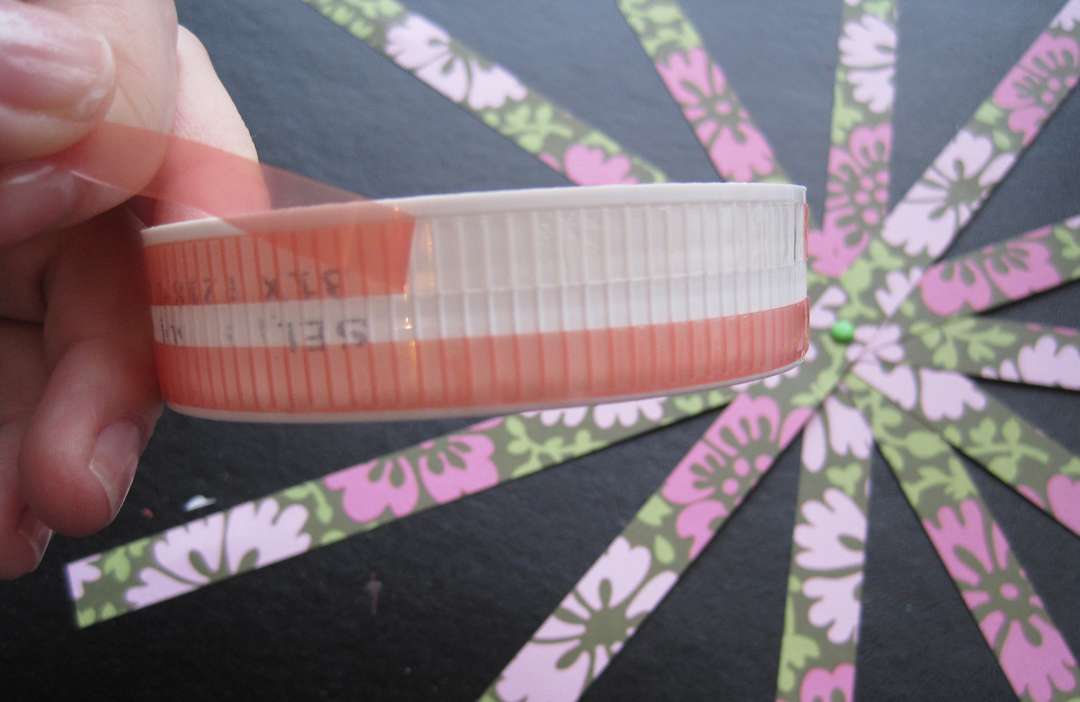 |
| Next I addred Sticky Strip (or you can use another very strong adhesive) around the lid. In the background you can see that I spread the strips to form a sunburst sort of a shape. |
 |
| To assemble the cage I started attaching the strips to the adhesive on the lid, one by one. Make sure to leave an opening so you can more easily add the spanish moss and your birdie inside the cage. |
 |
| One of the things I would do differently next time is attach the bird to the inside of the cage before attaching the top to the base. It would make things much easier. What I did this time, was punch two bird shapes (using my awesome Stampin' UP! punch) and sandwiched a string between them. I used a silver cord, but a clear thread would look more like the bird is flying. Then I tied the other end of the cord to the base of the brad (on top on of the cage), so my bird hangs in the center. Then I attached the last of the top to the base and covered the bottom with the strip I precut earlier. I also added a few flowers to the cage for an extra little touch. |
 |
| Here are the latest "birdie" projects I created. |
Friday, March 4, 2011
2010 Family Mini Album
Here is a mini scrapbook I made to capture some memories from 2010. This was inspired by a tri fold card that I saw somewhere around Christmas time. Definitely will be doing one of these projects at one of my classes.


 |
| The band that holds it all together features one of the flowers I will be teaching how to make next week. |

 |
| Beautiful family picture taken by the very talented Sharon Korsu of Creative Images 4. Check out her work at http://www.korsuphotography.com/ |
 |
| Looks like I need a new camera... but at least this gives you an idea of what the album looks like open. |
Wednesday, March 2, 2011
Just a little peek...
Here is a little sneak peek at one of the flowers we will make at my first class. They are about 3" in diameter. Super cute and shabby... and oh so easy to make.


Subscribe to:
Posts (Atom)